I recently received an invitation to a HUGE masquerade party. If you don't know me personally, you may not be aware that I have fantasized about going to one since I was a little girl. You may think of some recent television episode of a popular show featuring elegant ballgowns and tailored tuxedos. Personally, my first thought was the Masquerade scene in Phantom of the Opera. I'm actually planning a big road trip with friends to the event, as it's out of state, and asking someone particularly special to be my arm candy for the evening. I want the weekend to live up to my expectations, and since I'll be asking someone as my date, I realized it's only fair I provide them with a mask as he may not be prepared.
So, I need TWO masks. One for me, one for him. I happen to never throw anything away, so I'll be using one from a previous Halloween costume, and another from a past Mardi Gras celebration. This tutorial is great for a mask that just needs some retouches or even if you just dislike the color. You can also use this on an undecorated mask to give it the look you'd like.
What you'll need:
Mask
[Mask]ing tape (Couldn't resist)
Hot Glue Gun
Exacto Cutting Tool (OPTIONAL)
Spray Paint (Try and think of what you'll be wearing with it when choosing a color)
Start by looking at your mask and decide what needs to be done, then follow what steps you find necessary out of this tutorial.
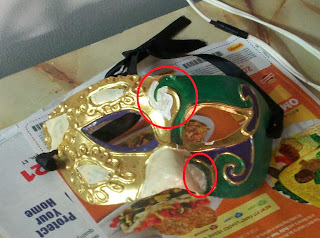
This mask had pieces chipped with the paint that were necessary to the textured swirling pattern.
I guessed at the finished look of the pattern and filled in the missing parts with the glue gun. My gun is a little old and my hands are a bit shaky, so my lines aren't perfect, but I don't consider them noticeable to those who don't read my blog. You'll see them better on the painted mask nearer the end of the post.
Next I wanted to conserve the sheet music artwork on the mask already. To do this, I took small bits of masking tape and pressed them over the parts I wanted untouched. I used the Exacto Cutting Tool to get better definition and tear away the excess tape so I wouldn't have to worry about the old colors showing through after the painting process. I had the thought that I could take either more music or pages from an old book and Mod Podge them onto the mask after painting, but the masking tape was just as efficient.
Alright, a final look before going outside to paint...
OH RIGHT I don't want those ribbons all crunchy with dry paint! Cover those with some tape, too. I just went about halfway down each ribbon, making sure the tape didn't stick to the actual mask.
Time to paint! I love painting. Even spray painting. I used a Metallic Silver on this mask, and a Satin Red on the other that you'll see near the end.
PLEASE make sure you paint on a surface you don't mind getting permanently altered, and in a well ventilated area. Outside in a remote part of my backyard near my shop is where I set up my little pedestal (empty peach cans work great).
Follow the safety guidelines and instructions on the can's label. Also, don't forget to check under the ribbon and along the edges of the mask for old color to cover. I also painted the back of this one, as it had some writing on it I wanted to cover.
Make sure you didn't miss any spots and allow to dry.
Next, remove your tape, and you're done!
My other mask, the one I'll be wearing myself, I had to repair where the ribbons attach to the inside of the mask. The end were glued and tipped with felt circles to prevent the ribbon from coming loose, but the base white paint on the inside of the mask came off where it was glued, detaching the entire ribbon. This happened on both sides, and I repaired it twice. The first time I used glue dots, found in the scrapbooking section of your local hobby store or WalMart. The second time I used Gorilla Glue. The second repair seems much more permanent than the first.
This mask was originally a darker red with gold glitter accents, but the paint had chipped, and I had Red Satin spray paint from a previous project lying about. Voila.
If we happen to be at the same Masquerade this fall, be on the lookout for the supermegafoxyawesomehot couple wearing these, and feel free to say hi!


No comments:
Post a Comment